Options
There are a bunch of various options that you can set for any calendar. This is where you go to set them.
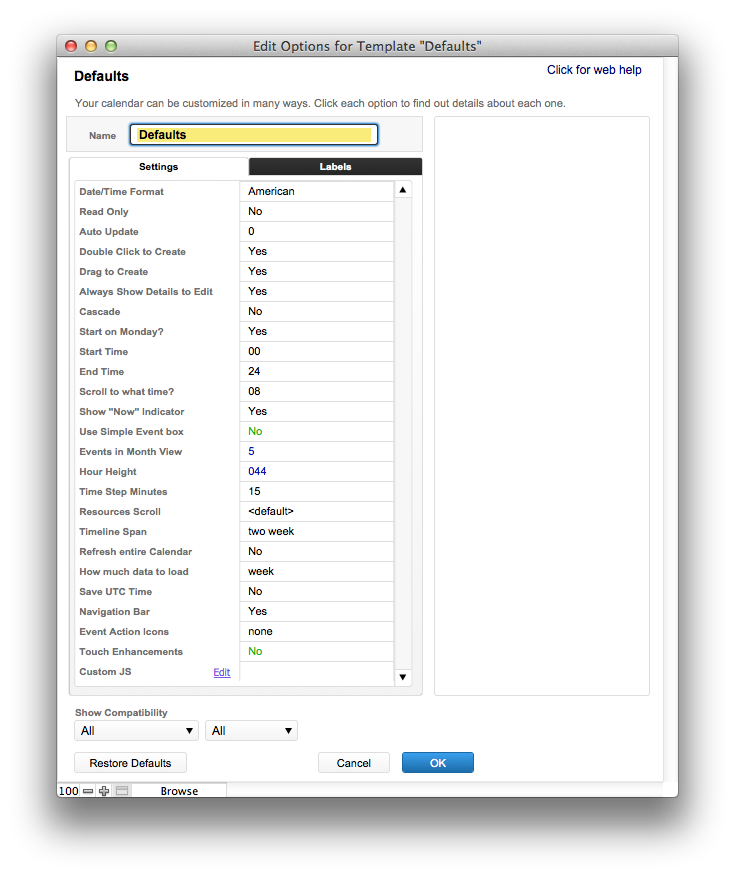
- Date/Time Format – American/European. This controls both the display and interoperability of your calendar with FileMaker. (See Date Format)
- If your copy of FileMaker uses the time format MM/DD/YYYY, choose American
- Otherwise choose European
- Read only – can’t make any changes to the calendar.
- Auto-update – every x seconds, your calendar will automatically refresh all the events. This is useful for a networked environment, when changes are being made very frequently.
- Drag to Create/Double Click to Create – you can turn this option on or off.
- Always Show Details to Edit– with this option selected for Server-Side Async, you will alway open a popup window to edit events. Otherwise, day, week and unit view will allow you to edit text “inline.”
- Cascade – instead of showing your overlapping events side-by-side, you can choose to cascade them on top of one another.
- Start on Monday? – start the week and month view on a Monday instead of a Sunday.
- Start and End Time – a hard beginning and end time for your calendar – you won’t see events before or after this time.
- Scroll to What Time? – When the calendar is drawn, automatically scroll to a particular time. You can still scroll back up to see earlier times. This is midnight by default.
- After Hours Indicator – Show an indicator on the calendar when events occur before the start time or after the end time (and therefore are not visible on the calendar). This will show a shaded section for the first or last 15 minutes on the day, week, timeline, or resource or planner views. If the event is assigned a resource, it will only show up on the resource, planner and timeline views.
- Show “Now” Indicator – show a red bar on several views indicating the current time.
- Use Simple Event Box – show the event on the day, week, and resource view without the time bar. This allows you to (a) have a more streamlined look to your events and (b) fit short events into smaller time slots.
- Events in Month View – How many events do you want to show for each day in Month view? If there are more events to show, there will be a “x more” button at the bottom of each day, which will jump you to day view to look at the rest of the events for the day. Choosing zero for this option will show all events for each day.
- Hour Height – by doubling the height of an hour in week and day view, you can get more detail on the page. In order to keep the lines of the calendar lined up with the horizontal lines, you should choose a height from the drop-down menu – they need to stay in multiples of the size of the grid.
- Terrace & Flat layouts should be multiples of 22px. The default height is 44px.
- Time Step Minutes – Determines how events are displayed and dragged. For example, entering 15, would allow a drag-create to make an event at 12, 12:15, 12:30, and 12:45, but not at 12:10.
- Resources Scroll – Controls how many resources you can see on the Resource view before you will need to scroll to the next group of resources. If you don’t choose anything, all your resources will show on the screen at once.
Note: Make sure this number isn’t bigger than the number of resources, or the resource view won’t work - Timeline Span – Choose from day, week, two week or month. You can also type in a specific number of hours.
- Refresh Entire Calendar – Every time you make a change, the entire calendar will refresh. This is useful if other people are also making changes to the calendar at the same time.
- How Much Data to Load – optimize how fast events are loaded by loading more or fewer events at a time from the server.
- Save UTC Time – don’t choose this unless you’re prepared for some under-the-hood work. This setting will:
- Assume that all dates and times stored in FileMaker are UTC.
- Convert FileMaker times from UTC to local time, based on your computer settings.
- Write back UTC time to FileMaker when using Server-Side Async.
- Navigation Bar – you can completely hide the navigation bar from view so that all you see is the calendar grid. You will then have to navigate the views and the date by changing the Source of the web viewer (see Deploy options for how this works).
- Event Action Icons – typically we keep those off. They can be useful for Server-Side Async, however, if you want more control over what clicking an event does. A selected event will then have a tiny toolbar attached to it with the following options:
- Edit an event: show in-line editing window.
- Info for an event: show a popup window to edit your event
- Delete: Deletes an event.
Keep in mind the behavior differences depending on if you use Client-Side Scripting, versus Server-Side Async.
When you choose Client-Side Scripting:- The edit button will run a script in FileMaker Pro when save the event by pressing “Enter” on your keyboard, with the new text of the event in the $text variable.
- The info button will run a script in FileMaker Pro when you click “Save”, with the new text of the event in the $text variable.
- The delete button will run a script in FileMaker Pro with “Delete” as the $event_type variable.
- Touch Enhancements – Adds touch-centric features:
- Swipe between dates
- Clicking shows a larger menu with a preview of the event
- Hold & Drag adds a hint overlay, showing where you’re dragging
- Custom JS – at the request of Support, we may ask you to enter something in here to add or change a feature of the calendar. Otherwise, this field will usually be blank.
Labels
Just about everything can be re-labeled, so you can use your own text for what Resources represents, for example. This is button to click to change how any constant text appears on your calendar.
If you’re working in another language, you would first select your language in the layout section, then update the labels here.
- In this section:
- Date/Time Format
